
I finally finished my Thanksgiving apron! It was so easy, it just took me longer because I had to do it in baby steps. That and I think everything takes longer the first time you are doing it.

I obviously didn't sew the apron, but I did the appliques. It's not perfect and it's not something that anyone would actually pay money for (ha!), but I love it. For starters, I can say that I actually did it! 
Why, blogger? Why would you flip my picture? You have caused me much trouble tonight.
*
And then there is that adorable little turkey at the top. 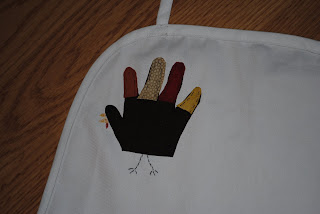 That, my friends, is my sweet baby boy's hand. That hand brings me immeasurable joy daily and I thought this way I could start every fall holiday by putting my hand on top of that little hand and think of all of those sweet moments. The little hand that he places on my cheek when he gives me kisses. The little hand that reaches up for me so energetically each morning to get him out of his crib. The little hand that graspes at mine wildly when I reach for him while he is in his carseat. The little hand that pats my arm or back when I am holding him. The little hand that is oh so soft. The little hand that holds my heart. There isn't another little hand in the world like his and I don't EVER want to forget it!
That, my friends, is my sweet baby boy's hand. That hand brings me immeasurable joy daily and I thought this way I could start every fall holiday by putting my hand on top of that little hand and think of all of those sweet moments. The little hand that he places on my cheek when he gives me kisses. The little hand that reaches up for me so energetically each morning to get him out of his crib. The little hand that graspes at mine wildly when I reach for him while he is in his carseat. The little hand that pats my arm or back when I am holding him. The little hand that is oh so soft. The little hand that holds my heart. There isn't another little hand in the world like his and I don't EVER want to forget it!I told Matt I left enough room for about 2 more future babies' hands (for every future babies' 1st Thanksgiving, I will add their hand to the apron). But he thought just adding one more would make it look more symmetrical... we'll see ;)
Anyway, I thought I'd share the details of how to do your own applique. It really is a lot of fun!
First you will need a great friend to ever so kindly send you an email giving you step-by-step directions: 
Thanks Kayla! (Gosh, this picture makes me excited to finally blog about her absolutely amazing wedding!!! Isn't she just a drop dead gorgeous bride?!)
Thanks Kayla! (Gosh, this picture makes me excited to finally blog about her absolutely amazing wedding!!! Isn't she just a drop dead gorgeous bride?!)
And now I will basically just copy & paste from the email:
Things you will need:
Shirt or Onesie to apply image to (in my case, apron)
Computer/Printer/Scanner ( I didn't need this as I just traced his hand on a piece of paper)
Iron
Fabric(color & print of choice)
Thread(color of choice)
No Fray Glue

Heat-n-Bond Ultrahold, no-sew

Needle & Pins
*Wash all clothes and fabric pieces before hand
First off, think about what image you are wanting to create. I find it best to google it and then search through images. Sometimes I even put "cartoon" in the front because then you actually get child like images and drawings that are great for his age.
Secondly, print the photo out at its regular size, black and white.
Thirdly, you will want it bigger and it will help if you have the shirt or onesie in front of you so you can see what it will look like. The bigger it is the easier it will be to sew and iron onto your shirt. Figure out what is best in making it larger. Sometimes you can do that on your computer but for me we scanned it and then you can increase the image 25%, 50%, 75% etc. It took us a few times in order to find the right size.
Fourth, once you have the picture make a mark on the picture to where you would like different colored fabric. Take the monkey face for instance, the base of the head was brown and the center was an ivory. So you will need to make a copy of the picture the number of times you want a different fabric.
Fifth, you will cut out each individual section that will be a different fabric. This will only make it easier on you! At this time you should be able to place each piece of paper into the form of the WHOLE image you are trying to get, layering it. And it should all fit perfectly seeing that you made "x" amount of copies all at the same size.
So here you are with pieces of paper that will make the greater picture. To help at this point I would outline the paper onto a more sturdy form like cardboard. This way it won't slide out of place and it won't tear, plus you will be able to keep it longer and make more down the road if you want!
Sixth, choose your fabric for each section. Hobby Lobby, Joann's. Hancock, etc has individual 12x12 sheets of cotton fabric in all colors/prints, used mostly for quilting OR they will have your basic colors with different prints all rolled up together sold at one low price Also, always look at the clearance fabric because that stuff is usually sold at one low price for like a yard or less. I think using different colors is cute with prints. Be creative and don't worry if they aren't perfect or match. This is probably the one time that the more they are different, the better!! :)
Seventh, pin the non color side of the fabric to the cardboard (make sure that the fabric is ONTOP of the cardboard so it isn't backwards). Pinning will be difficult because it is cardboard but it will work. Flip it over and trace it on the back and then cut it out. Repeat for all pieces. At this point you can place all the fabric pieces together to create the image you want just like you did with the paper earlier.
Eighth, take the No Fray glue (you can find at Walmart, craft section, its a small tube of clear glue used for fabric) and put on the outside of each fabric piece so it won't fray during wash. Cut away any fraying you do not want.
Now you are about to create your own applique using the heat-n-bond and iron so you can physically hold it in your hands.
Ninth, line all fabric pieces on the heat-n-bond but the base, so just the pieces that will be going on top of the base ( heat-n-bond found at Walmart, craft section with sewing machines, BE SURE IT IS "NO-SEW") and cut it down to a good size to fit the fabric more closely, like a square or circle around it. Follow directions as given on heat-n-bond. The heat-n-bond disappears when heat is applied so don't worry about it getting onto anything such as the other fabrics. You won't be able to see it once enough heat is applied.
At this time you should be holding your applique that looks exactly what you had printed out with your own colors to fit the whole image!! You are now ready to sew ;)
Sewing is just a cute touch to tie it all together and to make people think that you actually sewed on the applique. However, I advise you to heat-n-bond after you sew the stitches because the knots and thread will rub against your sons bare chest and I can only think that it may not be so comfortable for him and to tell you the truth sewing it on will only be more difficult/annoying!! (So on my pocket that has the scripture, I forgot to sew the outer edges and had to do it after I had heat bonded (ha) it to the apron. It.Was.Awful. So, please don't forget to sew everything first!!!) So with that said, take your needle and color of thread desired and stitch along the outside of each fabric place. When all your outline stitching is done I like to look at the final image and do the little details like a smile or eyes, lines, etc. This is easier with thread then say fabric. Oh and if it would be helpful take a pen and make stitches/markings where you want to stitch then just follow that with your needle and thread.
After you admire your work and applaud yourself for creating something so adorable take the final applique as a whole and apply the heat-n-bond to the back, where all the knots are from the thread, then apply to shirt or onesie. May need to do a few times in order to make sure all the sides are well in fact in place! Don't just hold the iron on it or the iron will burn the white shirt...trust me. ha!
After this I like to throw it in the wash one last time to make sure it holds up, after dried if it seems to be peeling just apply the iron to it. Do this whenever needed... the beauty of it!!
I hope everyone has a wonderful Thanksgiving. I will be sporting my new apron while I bake my pumpkin pie in the morning!

4 comments:
Precious post! I love your feelings about Connors little hand, I know all too well exactly how you feel. And you'll ALWAYS feel that way!! I still kiss Andrews little hand a thousand times a day :) You're an awesome mom!!!!!!
Great job on the apron Kelli! I'm with you on this one...there is plenty of room for two more hands!
Kell Kell You did a GREAT job!! ANd I cried when I read all you said about his little hand. And Yes Kayla was a GORGEOUS bride. We love her so!
An apron, I LOVE IT!!! You did an awesome job Kel - I knew you were crafty! It will get more and more fun (and addicting) once you get comfortable with it and think of new ideas! Which I wouldn't doubt if you have already thought of something else, possibly for Christmas ;) Great gifts for ALL! Although with your size of family you should probably start on it now. ha.
This is what I'm thinking...
2 more hands across the top (Matt, symmetrical, hilarious) then, when time comes, you can fill the whole bottom part with GRANDKIDS hands!!! Whoop-whoop! :)
Post a Comment