
Why, hello Monday. It's time to join in with AP @ I Love You More Than Carrots for
Since I didn't plan on being here this weekend, I originally didn't think I was going to participate this week. Which meant I had nothing planned. Yes, I could have talked about the yummy recipes I used last week, and trust me I used some good ones. But 1) I didn't take any pictures of them (goodness, I do good just to get the food halfway to the table. More often than not my superhero hubs has to finish) 2) I wanted to actually do something. Something that I wasn't already planning on doing. So in true Kelli fashion these days, I browsed through my pins Saturday morning to see what I could conquer in a somewhat quick fashion. I cam across *this pin that had been pinned who knows how long ago. With that, it was decided. Off to Joann's I went. After coming thisclose to giving up on finding fabric (seriously, do you know how hard it is to find fabric for boys that isn't camo or have some kind of sports ball on it???), I finally settled on something. I say settled, because I would have LOVED to have all 6 feathers of the turkey in Chevron, but I worked with what I could find!

So, after getting all the materials together: Brown fabric for turkey body, orange fabric for beak, white and black fabric for eyes and 6 different fabric swatches of your choice for feathers, I made myself a pattern (NOTE: VERY IMPORTANT. MAKE A PATTERN!! THERE IS A LOT OF CUTTING INVOLVED) out of a piece of cardstock. I then traced each piece onto the coordinating fabric. I just used a pencil. Really fancy, I know. After you have all your pieces cut out, go around the edges of each piece with fray check. You will need somewhere to place the pieces on to let them dry.

While they are drying, take your patterns and cut out the shapes on the Heat N Bond. This is what makes your turkey (or whatever you are making) stick to the shirt.
 NOW, I forgot this next step and highly recommend not forgetting it. Usually, I will take a needle and thread and go around the edges of all my pieces to give it more of a finished sewing machine look. Of course, it looks nowhere near as good as an actual sewing machine, but we are only human ;). Since I forgot to do this at this point, I did it after I had already adhered it to the shirt. My fingers took the brunt of that bad mistake!
Next, you will iron the heat n bond onto each piece. The instructions are on the packaging. After you have done that, trim off the edges. I would actually recommend doing that before you iron it on there to begin with because otherwise you will get the sticky residue on your iron, which will then get on your applique. Awesome.
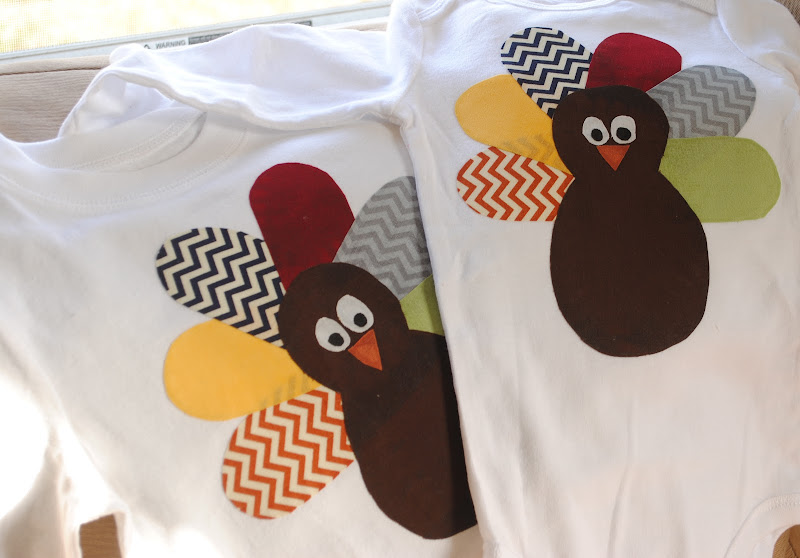
Before you peel off the back paper and iron it onto your shirt for forever and ever amen, be sure to lay it out and figure out which pieces to do first. In this case, I started with the orange chevron feather, went all around layering each one on top of the one before followed by the turkey body, nose and eyes.
Unlike me, if you had already sewn around the edges of your turkey pieces, you would be done! Instead, I got to sit here for 2 hours tonight trying to push a needle through all those layers! In fact, I only finished Connor's shirt. I'll finish Cade's when I can no longer see the dents in my fingers from the top of the needle! HA!
So, of course, it isn't perfect. The chevron fabric worked so much better than the solid colored fabric, which is funny since it is all 100% cotton. The beauty of this is you can use whatever fabric your heart desires!
*So, I figured out that the pin I found was actually linked to an etsy shop that is on vacation. Hers is, ahem, much cuter which is probably why she sells them!

So, after getting all the materials together: Brown fabric for turkey body, orange fabric for beak, white and black fabric for eyes and 6 different fabric swatches of your choice for feathers, I made myself a pattern (NOTE: VERY IMPORTANT. MAKE A PATTERN!! THERE IS A LOT OF CUTTING INVOLVED) out of a piece of cardstock. I then traced each piece onto the coordinating fabric. I just used a pencil. Really fancy, I know. After you have all your pieces cut out, go around the edges of each piece with fray check. You will need somewhere to place the pieces on to let them dry.

While they are drying, take your patterns and cut out the shapes on the Heat N Bond. This is what makes your turkey (or whatever you are making) stick to the shirt.

Next, you will iron the heat n bond onto each piece. The instructions are on the packaging. After you have done that, trim off the edges. I would actually recommend doing that before you iron it on there to begin with because otherwise you will get the sticky residue on your iron, which will then get on your applique. Awesome.
 |
| see that extra piece on the *your* left edge? Trim that off. |

 |
| Those darker stripes on the turkey you see? That is the aforementioned sticky residue! |
So, of course, it isn't perfect. The chevron fabric worked so much better than the solid colored fabric, which is funny since it is all 100% cotton. The beauty of this is you can use whatever fabric your heart desires!
*So, I figured out that the pin I found was actually linked to an etsy shop that is on vacation. Hers is, ahem, much cuter which is probably why she sells them!
4 comments:
Love it! May have to try this too.
I love your fabric choices!
this is adorable! i love the fabric you chose- mixing the chevron and the solid looks so cute! thanks so much for sharing and for linking up! have a great week!
Super cute! I think I'll have to give this a shot next year!
Post a Comment